This is the quilt we'll be making a backing for. This quilt will be auctioned off at the upcoming DeGroot Reunion in July. We use the proceeds to purchase food and supplies for almost 80 people each year at breakfast for two days. The money is also used for as drinks throughout the weekend and other miscellaneous paper items such as plates and napkins.
 |
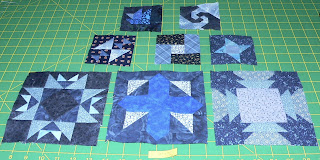
| The quilt we are making a backing for |
The quilt measure roughly 57" x 57" so far. The backing piece needs to cover the entire back of the quilt. Since fabric generally comes in 42" widths off the bolt, I need to piece the backing together to make sure I have enough to cover the entire top. I ensure I have enough extra so my clamps and leaders on the long arm don't interfere with the quilting process.
 |
| About 5" extra on both sides |
The selvedge has to be removed from the inner edges before sewing them together. I know other quilters who keep the selvedge on while piecing the backing but I have, through experience, found that the seams pucker and bow and don't give an even sewing line. This becomes difficult when pressing and then loading the quilt onto the frame. Another reason I take the selvedges off is that it provides me with material to use in my much-sought-after selvedge quilts (see previous posts on pics of such a critter)
 |
| Remove the selvedges before sewing the backing pieces. |
The fabric I have chosen for the backing is a directional print so I have to make sure the print all runs the same way prior to sewing them together, otherwise (and even though nobody really pays attention to it) the back side of the quilt would look pretty silly.
 |
| Directional prints have to be sewn together with the motif all running in the same direction |
The longest sides are sewn together using a 1/2" seam allowance. I generally press the seam open on the backing and this is the reason I use a rather generous seam allowance. Another reason I press the seam open is for the quilting side of things. An even seam produces a nicer quilting motif without the hopping foot skipping over a lengthy seam that is bulky.
 |
| Sewing the backing together taking a 1/2" seam allowance |
The rest of the back has to be pressed now to make sure all those nasty wrinkles and creases are out before loading on the quilting frame, otherwise you get puckers in the backing while the quilt is being quilted.
 |
| Ugly wrinkles and creases have to be removed |
Once the back is pressed and ready to go I get it right on the frame to make sure we don't have to repeat some of the process over again. A good rule of thumb is to not make the backing piece until you are ready to quilt the quilt. It saves a lot of time and energy, believe me!
 |
The seam is pressed open and wrinkles are removed. Time to go on the frame!
|

Comments
Post a Comment