Loading a Quilt
Here is todays subject we will be quilting. This is a baby quilt for one of Jim's cousins who has a baby shower two weeks from Saturday. I like to stay on top of these things, so I made her a baby quilt yesterday. Now it's time to quilt it!
After selecting the backing fabric earlier this morning and pressing the wrinkles and creases out I am going to take it to the long arm to load. This quilt is small enough that I could actually do it on my regular sewing machine, but I need the long arm practice and I have something in my head of what I want to quilt on it.
 |
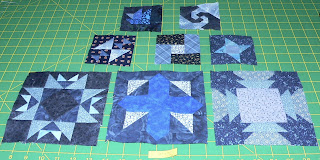
| Our target quilt for the day |
After selecting the backing fabric earlier this morning and pressing the wrinkles and creases out I am going to take it to the long arm to load. This quilt is small enough that I could actually do it on my regular sewing machine, but I need the long arm practice and I have something in my head of what I want to quilt on it.
There are many ways to load a quilt (I am told), but this is how I find that it works for me. Do not think this is the only way to do this process. Experiment with your long arm/frame to see what works best for you. And, if you have a better way, please share! There is always something new to learn!
 |
| The front is to the right and the rear is to the left |
I'll first introduce the components of my particular long arm (Handi Quilter Fusion). I have three roller bars (four actually, but one is used to separate the layers and aids in rolling the quilt as I move along). The first bar, or the bar closest to the front, is what I refer to as the belly bar. I rest my belly on it while loading all the other layers and while quilting my top. The belly bar is where the backing is loaded onto.
The second bar in front is for loading the top. Many seasoned quilters remove this bar entirely because they do something called "floating" the top. They don't attach it to anything and just let it "float" on the backing/batting layers while they quilt it. I was advised that when using my computer to quilt (rather then me just free-motion quilting), it's better for the top to be attached to the leader rather then letting it float. And, the one quilt I have floated turned out kind of wonky and not real square, so that seems to be something I don't quite understand as of yet.
What is a leader? Those canvas thingies there you see around the bars. That's what I attach the backing and the top to. Each bar has their own leader to pin to. Neat, huh?
 |
| Find the center of the backing to line up with the leader |
I have located the center of my backing leader and have put a permanent mark on it to guide me for each quilt. Finding the exact center of the backing, I have learned, is not so crucial. You can muddle your way through without having the exact center marked. I just measure and take an approximate center pin in my backing fabric to guide me.
 |
| Pins to outside; fabric to the inside |
Now we pin, pin, pin. Lots of pins! I begin pinning the background fabric to the leader with the fabric inside the leader and pins to the outside (the side facing me). Once, I messed up and pinned to the inside of the leader and wow, did I learn quickly never to do that again. I skewed myself pretty good with those pins while rolling the backing up later. Ouch! Make sure the right (or printed) side of your backing fabric is facing down (towards the floor).
 |
| Center, left. Center, right |
I start in the center and work to the left, and then will move to the center again and work towards the right.
 |
| No telescoping! |
After the backing is attached (pinned), I roll the back towards me ensuring the sides don't telescope (in other words, stay even) and that no wrinkles get in there. I stop after each revolution to smooth the backing down and keep it feeding evenly. Sometimes I have to unroll the backing and start again. I guess this is normal especially if using a suspicious quality fabric that has been irregularly woven.
Next is the top. We follow nearly the same process with the top as we did with the backing but on that next roller in the front. The top should be face up (towards the ceiling). I have learned that quilting works best if the longest sides of the backing/quilt are pinned rather then the short sides. The machine will pull in at the sides slightly more then the ends that are pinned and the less surface area that pulls, the better.
 |
| Pins on top of top |
One other difference from the backing to the top is the pin location. Remember on the backing we put the pins in front of the leader? For the top I have found that putting the pins in the inside, right next to the top itself works best. It bends the top less when rolling and once again, keeps the quilter from being skewed by those nasty pins (because this is rolled opposite of what the backing was).
Roll the top away from you (the backing was rolled towards you if you remember).
Whew, we've done a lot of work so far and we have one more step to go. This is the hardest/easiest stop there is. Easiest because nothing has to be rolled. Hardest because I have to bend over and kind of dangle across a 24" span to pin the backing to the other rear (take up) leader. Here's what I mean:
 |
It doesn't look like a long expanse, but after a 1/2 hour it certainly is! |
Some of the backing fabrics I have been using are mystery backs. I don't know where they came from or what their quality is. I know some of them have been poorer quality because the weave is uneven and the backing bows or ripples diagonally after I have spent all that time to pin it on to the leader.
To get over this particular hurdle, I have found that after finding the center of your backing fabric on the take-up leader (once again, I just measure and put a pin as close to the center as I can and then line the pin up with a permanent center mark I have on my leader), put one or two pins to the left of the center pin.
Now shift to the right and put in one or two pins (whatever you do on the left, do the same on the right). Continue back and forth until the fabric is completely pinned. It's great exercise and after unpinning a few backing fabrics (even if I carefully measured and marked) came up with this solution. Thank you physics majors Andrew and Laura for giving me this idea.
 |
| Adding the batting |
The batting is the last thing I put in. The bar that has the top loaded on it removes pretty easily and I just scoot the batting in between the two layers. This way I don't have to monkey around with the batting (which can be kind of grabby) until I'm ready to actually start quilting.

Comments
Post a Comment